
This is my first tutorial! Since no-one else seems to have written about this before, though, I thought I should note how to do it.
I can't be the only person who wants to know how to make a planet without using LW6.5...?
Okay, before we go any further, I should note what materials I used to do all this:
As you can see, the quality of my materials wasn't all that great. In other words, almost anyone should be able to do this.
Conception
Okay, the first thing you need to do is to think of how you want the planet to look. I wanted a planet with about the same water-to-land ratio as the Earth, with the same general color scheme. I also wanted lots of fjords (me in my Slartibartfast mode). You might want something different. I assume, though, that in this tutorial you will be creating an Earthlike planet. Some of the things in this tutorial don't work for Mars or Jupiter-like planets.
I also wanted a medium-resolution planet. I don't plan to do any extreme close-ups with it, just medium distance or greater shots. My planet should therefore be about 600 x 1200 pixels. If you want something higher-resolution, go for it, but remember that the higher the resolution, the more memory it will use.
You may also want to look at some real images of the Earth. I have found some very nice references on the Johnson Space Center webpages. Try hunting around at other NASA sites for other great images of the Earth -- doing a search on "limb" will almost always turn up beautiful panoramic views of the curvature of the Earth. Also, there are many excellent photos from the Apollo missions that show the entire globe. I especially recommend the photos from Apollo 10.

Creating the planet's geography
Okay, here's the first tricky bit.
First, download one of the various images available of the Earth. I recommend the one available at JHT Planetary Emporium, or at Dave Seal's Maps of the Solar System. Alternately, if your computer has enough memory, use the Blue Marble maps, which are probably the best around. Open this image into your 2D image-editing program. I'm using Paint Shop Pro.
Now, open a second, new image. It should be the same resolution as the Earth image you're using, unless your planet is much larger or smaller than the real Earth. If it's smaller, use a smaller map; if it's larger, use a larger map. However, either way, the aspect ratio should definitely remain the same.
Turn on the clone brush. Set the reference point somewhere on the Earth image, then put the cursor on the new image. Now draw away.
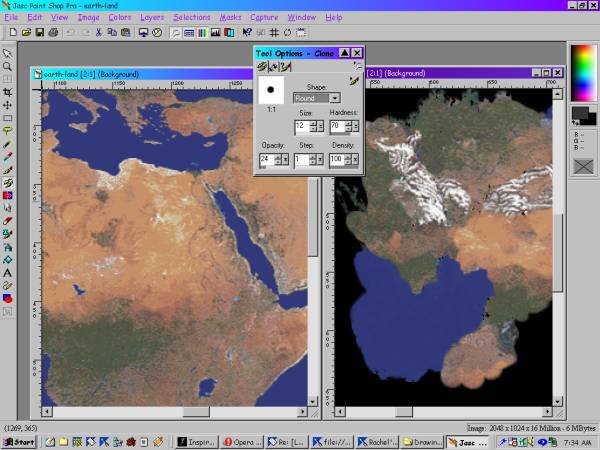
Figure 1: Clone-painting the planet's surface.
Create your own geography, but don't forget the following:
Once you're done with the oceans, your map is basically done. However, it's a good idea to tint the whole image slightly blue. This is because, when viewed through the atmosphere, it should look slightly washed out due to the atmosphere. This is most easily simulated by making the surface itself slightly bluer. Go into "Colors --> Adjust --> RedGreenBlue," and make the blue about 10% higher. Save this image as "planetXgeog" or something like that.
If you want to create a bump map for your planet, I would recommend the following. Add a new layer, then fill it with black. Put the layer over the surface layer, and lower the opacity so you can see the layer below. Spray paint the areas over the mountains with a slightly lighter color of gray. Select the whole layer, cut it and paste it as a new image, then save the image as something like "planetXbump" or whatever.
However, it actually isn't all that realistic to have a bump map. Think about it -- the highest mountain on Earth (or highest above sea level, anyway) is Everest, right? And how high is it? 8,848 meters. What is the diameter of the Earth? About 13,000 kilometers. So the height of Everest compared to the diameter of the Earth is tiny, and any bumps you make are likely to appear thousands of times out of scale unless you're doing extremely close-up rendering. Also, the bumps will likely only be visible near the terminator line (the line between night and day) when the terminator is edge-on to the viewer. While this does happen pretty often, I think that just giving a bump map to the clouds is enough.
A specularity map is a must, though. In order to do this, you need to change all the blue parts of your image into white and all the land surfaces into black. This is easy to do -- simply use the magic wand selection tool on any area of the ocean. Then go to "Selections --> Modify --> Select Similar." This should automatically select all the water surfaces. Then either flood fil or color replace all of these to be white. Invert the selection, and then make all the land areas black by a similar method. Save the image as "planetXspec" or whatever your little heart desires.
Another nice thing to have is a nighttime map of your planet. If you want one, first think about the level of civilization of the planet. If it's a pre-industrial (and most importantly, pre-neon) civilization, the cities, even if there are any, won't show much light. Another important consideration is whether the planet has any moons or other alternate lighting at night. If it doesn't the planet's night-side may be almost completely dark. However, if it isn't, follow the following steps to make the nighttime version.
First, load the basic surface map -- the color one with all the landforms. Add a new layer. Flood fill the new layer with black, and knock the opacity down so you can see the other layer. Go into the Spraypaint tool, and select a smallish brush with very low density -- say, 5 pixels wide and 25% density. Now, go over the places where cities would likely form, and paint in a whitish-yellowish color on the black layer. When you're doing this, remember the following:
Once this is all done, save it as "planetXnight" or something similar.
Creating the planet's clouds.
After you have your land surface, you need to create the clouds. These can be difficult, and to be honest, this is where I am probably laziest. I often just use a direct copy of a map of the Earth's clouds because, while everyone recognizes what Japan looks like, few people will remember the specific cloud formations which were over Japan seven years ago on Tuesday.
Of course, making clouds assumes that your planet has normal Earthlike weather. If it's a gas giant, then the surface is the weather. If it's a desert planet, it's likely to have either much less weather or more sandy-colored clouds (dust storms). A water planet will probably have huge typhoons and hurricanes. But anyway, this isn't a geography class...
If you want, though, it's not hard to make your clouds unique. Open up a map of the Earth's clouds in your 2D image-editing program. First, you might start by deleting some of the Earth's clouds, but be careful -- if you delete too many, the planet will look unrealistic (or at least water-parched).
Next, select some clouds to change with the lasso selection tool, and use the various deformation filters to turn the clouds into other shapes. My favorite filter for this purpose is Twirl, which naturally makes cloud-shapes anyway. Just don't use it too much in any one place, unless you're trying to create typhoons.
Modeling the planet.
Next, go into Modeler. You should now create a basic sphere (using the LD_Tools Ball tool), but the number of sides and segments depends upon how you're going to be using your finished product. If it needs to stand up to close scrutiny, then something like 256 sides and 128 segments might be appropriate, but if your planet is only going to be used for distance shots, you might get away with as little as 36 sides and 18 segments. Select the sphere and give it a surface named something like "planetXgeog." Set it to Smooth, and make sure all the polygons are facing out. You shouldn't need double-siding if the polygons are all facing the right direction.
Save the resulting object as "planetXgeog" or whatever. Now, select the planet and use the Scale tool to resize it to about 100.06% on every axis. This will give dimensions roughly equal to that of the cloud layer of the atmosphere. Change the surface to "planetXclouds" or whatever and then save the object, naturally as "planetXclouds."
Resize the planet again, by the same amount. This will give the dimensions of the haze envelope. You can make it larger, but in fact, the atmospheric limb isn't even visible except from very small distances, so making it too large will also be a giveaway that your planet is CG. Resurface the resulting object as -- you guessed it -- "planetXhaze," then save the object as "planetXhaze."
Putting them together in Layout.
Now, go into Layout. Be careful about how you load the planet's parts -- if you want the planet to appear behind a bottle of beer or something, and you've created the planet to be 12,000 km in diameter but the bottle is only 30 cm high, you obviously need to be careful about camera positions and scaling.
Load the planetXgeog object first. Load the planetXclouds object at the same coordinates, and then parent it to the geog object. Load the planetXhaze object at the same coordinates and parent it to the planetXgeog object.
Surfacing the geography sphere.
At this point, you have to look at the lighting in your scene, and at the final effect you want. If you want realistic lighting, then you should only have one or two lights in the scene (the stars cast light, but not much). There should also be nearly no ambient light -- say, 1 or 2% -- because space doesn't conduct or scatter light like an atmosphere. If your lighting is much different from this, or if you want to create an unrealistic effect, the following won't apply much.
Go into the Surfaces tab. Find the surface menu for planetXgeog. Under the main Surfaces dialogue, use the following parameters for the planetXgeog surface:
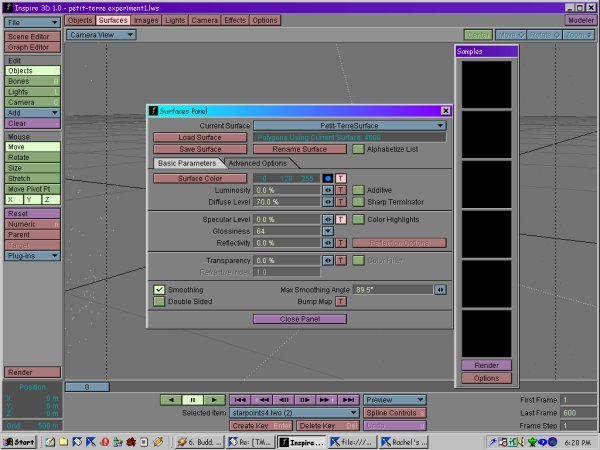
Figure 2:Surfacing the planet's geography.
Surfacing the cloud sphere.
Now go into the dialogue for the planetXclouds surface. Set the parameters as follows:
Surfacing the haze sphere.
This is perhaps the hardest part of the whole thing to get right. You want the haze to appear slightly blurry at the edges, but you also want it to be pretty much invisible at the middle of the globe, where there is almost no atmosphere between the viewer and the planet's surface. This is why you'll later need a fresnel shader.
The Fresnel effect is what causes a glass to have different reflection characteristics when seen edge-on than when seen face-on. The same thing makes an atmosphere much more transparent when seen face-on than when seen edge-on. Many plug-ins, free or not, are available to simulate the Fresnel effect.
The problem is, an atmosphere does not have a purely linear Fresnel effect. That is, it does not go straight from 100% transparency at 90° to 0% transparency at 0°. Instead, it goes from c. 85% at 90°, to about 10% at 80°, back to 100% at 100°. This means that you'll need the ability to assign a gradient to the Fresnel effect, not just a straight X-to-Y transition. Only one free plug-in that I know of allows this: CTBF shader, from Marvin Landis.
CTBF is kind of difficult to use, but it gives you access to gradients, and that alone makes it worthwhile. Its other functions are pretty cool, too, but don't fall within the province of this tutorial.
Finishing touches.
Some other nice things to put into the scene might include:
Rendering.
Okay, now your scene should be quite nice and ready to render. You should use any setup you prefer, but I recommend that you turn "Trace Shadows" on in the Render dialogue. When you're all done, you might have something like this:

Figure 3: A final render.
Acknowledgements.
In the process of figuring out how to do this, I had a lot of help. The following are all worth thanking:
Okay, so you'd like to go back to my main page.